Air-conditioning keeps you cool by circulating and cooling the air within the room. It makes life a whole lot more comfortable especially in Singapore’s hot and humid climate. To ensure that you get the best performance from your air-con, regular maintenance by professionals will be required. However, if you prefer to bootstrap it, you can put on some elbow grease and Do-It-Yourself (DIY).
This simple 20-minute Do-It-Yourself* aircon cleaning can:
– Help prolong your aircon’s lifespan
– Reduce monthly utility bills
– Reduce energy consumption
– Improve cooling performance
*Disclaimer: Please do take note that professional maintenance will be required for detailed cleaning and checks on the full operations of the aircon unit. Only with proper professional servicing then you can ensure that your aircon unit is dependable for years to come and be at its best performance.
1) Remove Outer Casing of Aircon
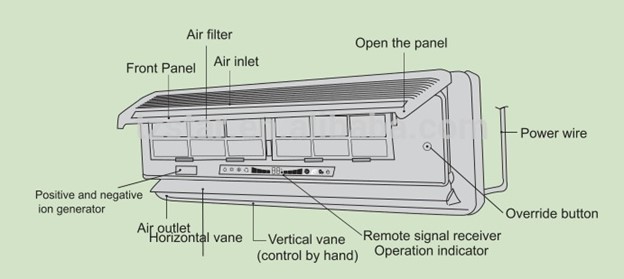
Safety first as always, please remember to turn off the unit. Next, open up the outer casing of the aircon – please do refer to your aircon model’s manual if unsure, as various models have different panel opening locations. Once the panels are lifted, the first thing you would normally see are the two air filters.
2) Remove the air filters and vacuum
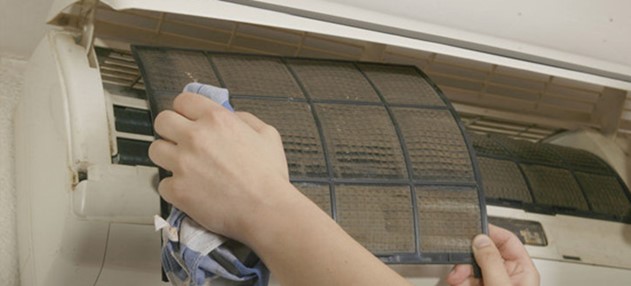
Remove the two air filters gently. If they are heavily coated with dust, you may want to remove them slowly and carefully take them to the bathroom to hose down the filters. Otherwise, a simple vacuuming would do the trick. After that, you can do a brief wipe down session with warm soapy (non-abrasive) water to further get rid of dust and bacteria. Now your air filters are clean and good to go and you can set them aside for the time being.
3) Locate the drainpipes and flush
Next, find the drainage pipes from your aircon system and flush water down from the in-built water tray. You can use any pail to pour water into the tray to do so. It is important to observe the water flow and if you find anything abnormal, it would be a good idea to contact your aircon contractor for further investigation. You may also choose to use a high-pressure vacuum cleaner to clear any dirt from the end of the drainage system first before flushing the water down.
4) Final wiping session
Last but not least, before assembling the aircon back to one piece, you can use a dry towel to clean the interior of the aircon. When putting the air filters back on, do make sure that they have been dried before putting them back the same way you took them out. You can do a final wipe down of the exterior of the aircon with a damp cloth.
There you have it – a quick and simple way to perform basic maintenance of your air-con that’ll save you a bit of cash. By doing so regularly you can improve the lifespan and the performance of your air-con. If you think that all that is too troublesome and are keen on a full aircon inspection and cleaning, you can always contact us and we’ll be happy to assist. Feel the difference with a freshly cleaned aircon today!